Transform Your Concrete Patio with Professional-Looking Color — No Contractor Needed
Want to give your patio a fresh, modern look? Staining your concrete patio is one of the easiest and most affordable ways to add color, character, and protection — all without tearing up your slab or hiring a pro.
In this DIY guide, you’ll learn how to stain a concrete patio the right way — step by step. We’ll explain:
-
The different types of concrete stains and which are best for outdoor patios
-
What tools and materials you’ll need
-
How to prepare your surface properly
-
Tips for achieving rich, even color that lasts for years
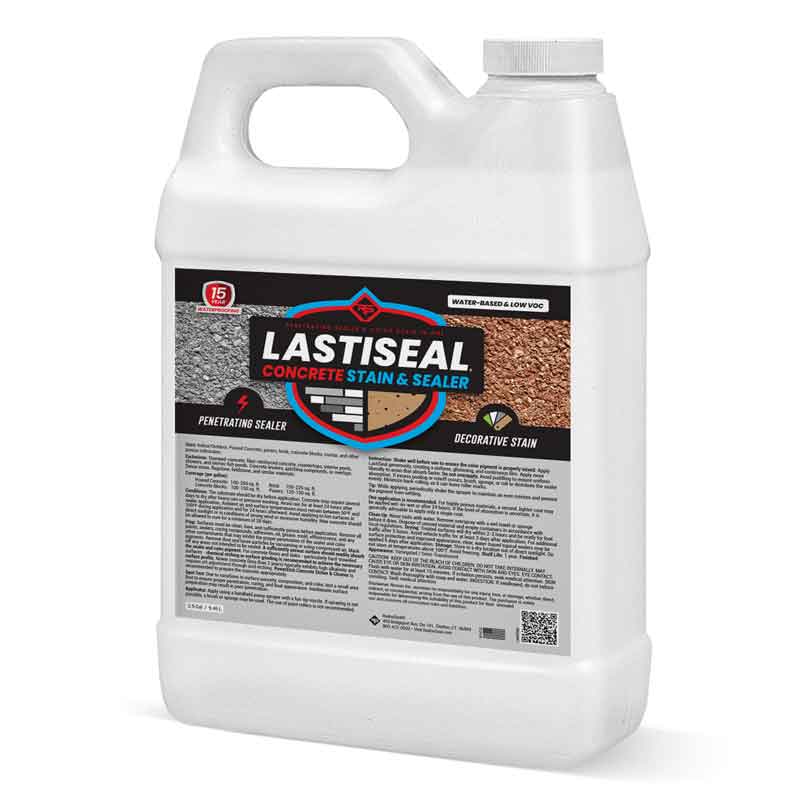
You’ll also learn why penetrating stain and sealer combos like LastiSeal® Concrete Stain & Sealer are the superior choice for homeowners who want vibrant, long-lasting results with minimal maintenance.
Whether you’re upgrading a weathered patio or starting fresh, this guide will help you do it right — the first time.
Types of Concrete Stains: What to Know Before You Start
Before you grab a brush or sprayer, it’s important to understand the types of stains available for concrete patios. Each has different application methods, appearance, longevity, and maintenance needs. Choosing the right one will affect how your patio looks — and how long it stays that way.
Here’s a breakdown of the most common options:
1. TOPICAL CONCRETE STAINS (Acrylic-Based)
Topical stains form a thin film on the surface of the concrete. These are often water- or solvent-based acrylic coatings that add vibrant color and a glossy finish.
Pros:
-
Inexpensive and easy to apply
-
Wide variety of bold color options
-
Creates a uniform appearance
Cons:
-
Forms a surface film that can peel or scratch
-
Requires frequent reapplication (every 1–2 years)
-
Faded or damaged areas must be completely stripped before recoating
Best for: Low-traffic indoor surfaces or temporary upgrades. Not ideal for outdoor patios exposed to weather and wear.
Futher reading on acrylic coatings: What You Should Know about Acrylic Decorative Coatings
2. PENETRATING CONCRETE STAINS
These stains soak below the surface and color the concrete from within, without leaving a surface film. They create natural-looking, variegated tones that highlight the surface texture.
Pros:
-
Produces a mottled, stone-like appearance
-
Can be used on porous concrete, brick, block, or pavers
-
Color is more UV-resistant than topical stains
Cons:
-
Requires a separate sealer to lock in color and protect the surface
-
Uneven absorption on variable surfaces
-
Porous surface required for proper penetration
Best for: Outdoor patios, driveways, and walkways with moderate to high traffic.
3. ACID-BASED STAINS
Acid stains chemically react with the concrete to produce translucent earth-tone effects — usually browns, tans, and greens.
Pros:
-
Creates permanent, marbled color effects
-
Doesn’t peel or flake
Cons:
-
Limited color selection
-
Requires careful handling of corrosive chemicals
-
Mistakes are hard to fix — you may need to grind down and start over
-
Must be sealed for protection and color retention
-
Typically the most expensive option
Best for: Decorative indoor floors or experienced DIYers willing to deal with extra prep and safety precautions.
4. STAIN & SEALER COMBOS (Penetrating Dual-Action)
Penetrating stain and sealer combo products offer a smart, all-in-one solution — delivering rich color and long-lasting protection in a single step.
Pros:
-
Stains and seals at the same time
-
No surface film — won’t peel or flake
-
Long-lasting protection against moisture, wear, and UV
-
Easier application and lower long-term maintenance
-
Safe for indoor and outdoor use
Cons:
-
Surface still needs to be properly prepped (porous and clean)
Best for: Homeowners who want vibrant, durable results without the hassle of multiple products.
➡️ Recommended Product: LastiSeal® Concrete Stain & Sealer – Combines premium polyester-polyurethane sealer with organic stain pigments that penetrate deep into concrete, brick, or pavers.
The Best Way to Stain Your Concrete Patio
If you’re looking for the easiest and most effective way to add color and protection to your patio, skip the separate stain and sealer approach. The best method is to use a penetrating stain and sealer combination, like LastiSeal® Concrete Stain & Sealer.
Unlike topical stains that sit on the surface and wear away quickly, LastiSeal penetrates deep into the concrete, brick, or pavers to deliver long-lasting color and industrial-grade protection — all in one step.
🆕 Why Homeowners Prefer LastiSeal® Stain & Sealer
✅ All-in-One Formula
Stains and seals in one easy application — no need for a separate topcoat.
✅ Deep, Vibrant Color
Organic stain pigments soak below the surface for a rich, natural finish that won’t flake or peel.
✅ Durable 15-Year Protection
Backed by a proven polyester-polyurethane sealer that strengthens the surface and resists wear, moisture, UV, and chemicals.
✅ Safe for Indoor and Outdoor Use
Water-based, low-odor, non-toxic, and safe for people, pets, and plants.
✅ Slip-Resistant Finish
Because there’s no surface film, treated areas remain naturally non-slip — even when wet.
✅ Limitless Color Options
Choose from 38 standard colors or mix your own custom shade.
Bottom line: If you want a long-lasting, low-maintenance finish that looks great for years, penetrating stain & sealer combo is your best choice. They are ideal for patios, walkways, driveways, and pool decks — and DIY-friendly.
How to Choose the Best Concrete Stain for Your Patio
Choosing the right stain for your concrete patio isn’t just about color — it’s about performance, safety, and durability. Before you commit to a product, here are the key factors to consider so you get the best long-term results.
TYPE OF SURFACE
Your patio surface will determine which types of stain are even compatible.
-
Plain Concrete: Works with all stain types — topical, penetrating, and acid-based.
-
Stamped Concrete: Use with care; color absorption may be uneven. Penetrating stains are often preferred.
-
Brick, Pavers, or Stone: Avoid acid stains and film-forming coatings. Instead, use penetrating stains like LastiSeal, which are designed for porous masonry.
✅ Pro Tip: Always test porosity. Pour a little water on the surface — if it beads up, it’s too dense for penetrating stains and may require etching first.
➡️ Learn how to properly prep dense surfaces with PowerEtch® Concrete Etcher & Cleaner.
DESIRED COLOR & FINISH
The look you want will influence your product choice:
| Stain Type | Color Options | Appearance |
|---|---|---|
| Topical (Acrylic) | Wide range | Solid, uniform color |
| Penetrating | Nearly unlimited | Mottled, natural look |
| Acid-Based | Earth tones only | Marble-like, variegated |
| Stain + Sealer Combo | 40 colors, mix colors for unlimited options | Rich, variegated, natural look |
🎨 LastiSeal offers one of the widest color selections available — with the added benefit of deep penetration and built-in sealing.
FOOT TRAFFIC & EXPOSURE
Is your patio used for entertaining? Does it get frequent rain or sit in direct sunlight?
-
High-Traffic Areas: Choose a penetrating stain with a hardening sealer for best wear resistance.
-
Pool Decks & Wet Areas: Avoid slick film coatings. Use a non-slip, penetrating solution like LastiSeal.
-
Sunny Locations: Look for UV-resistant pigments and a sealer that won’t yellow or fade.
☑️ The best concrete stain for patios is one that enhances color and protects against weather, foot traffic, and time — not just one or the other.
Step-By-Step Guide to Staining a Concrete Patio
Staining your patio can be a smooth, rewarding DIY project — if you follow the right process. Here’s how to do it the right way, from prep to finish.
Tools & Materials You’ll Need
-
Concrete stain (we recommend LastiSeal® Stain & Sealer)
-
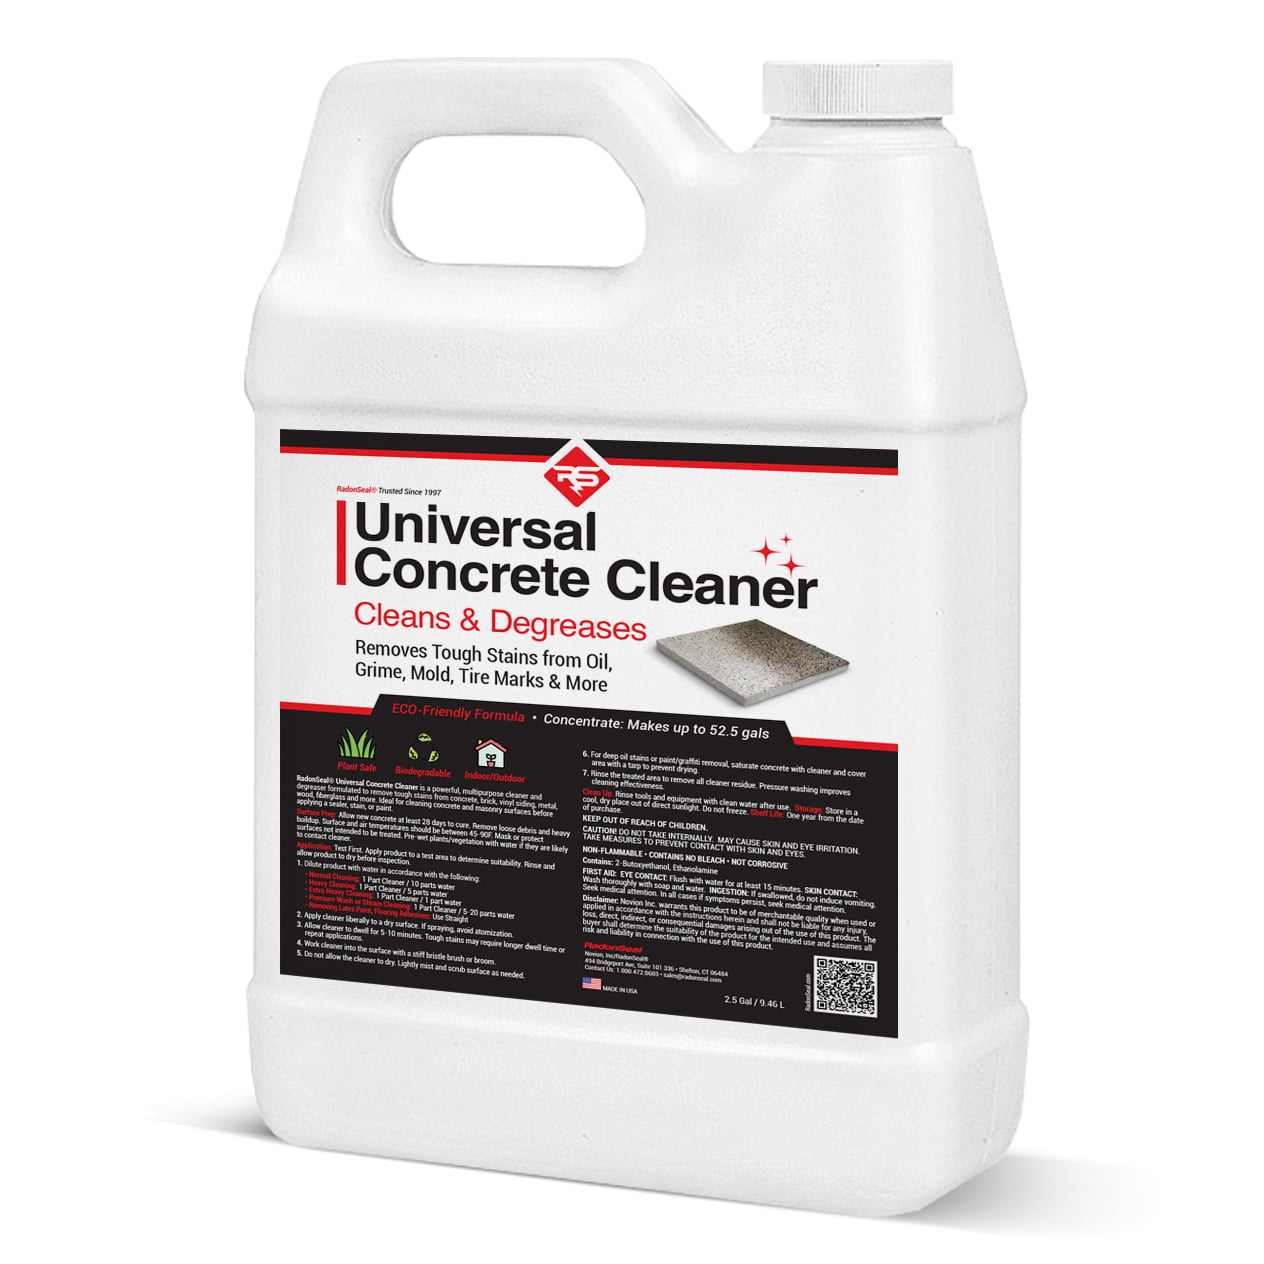
Concrete cleaner (e.g., RadonSeal® Universal Cleaner & Degreaser)
-
Pressure washer or garden hose
-
Hand-pump sprayer (preferred) or paint roller
-
Safety goggles
-
Plastic sheeting or painter’s tape (to mask off edges)
-
Optional: Concrete Etcher (e.g., PowerEtch® Concrete Etcher)
Tools & Equipment – What You Will Need
Before you begin staining your concrete patio, gather the following supplies:
- The patio stain of your choice
- Concrete cleaner
- Pressure washer or hose
- Hand pump sprayer or paint roller/brush
- Rubber gloves
- Safety goggles
- Protective clothing
Step 1 – CLEAN THE SURFACE THOROUGHLY
A clean surface is critical. Stains, oils, mold, BBQ grease, tire marks, and efflorescence will show through the finished color and may prevent adhesion.
-
Use a high-quallity concrete cleaner/degreaser to remove contaminants.
-
Rinse thoroughly with clean water — no residue should remain.
-
Let the patio dry fully (at least 24 hours) before staining.
➡️ Learn how to choose the right concrete cleaner for your patio
Step 2 – CHECK POROSITY AND SURFACE PROFILE
Your stain needs to soak in — not sit on top. Here’s how to test:
-
Porosity Test: Pour a small amount of water on the surface.
-
If it soaks in within 30 seconds — it’s ready.
-
If it beads up — the surface needs etching.
-
-
Surface Profile: For topical stains, the surface should feel like 150-grit sandpaper. If it’s too smooth, stain won’t bond well.
🛠️ If needed, use PowerEtch to safely open the pores — especially on troweled or dense concrete. It’s non-toxic, non-fuming, and safe for indoor or outdoor use.
➡️ Learn how to determine if concrete etching is necessary
Step 3 – APPLY THE STAIN
Now the fun part: adding color.
-
Always test in a small, hidden area first to confirm color and absorption.
-
Use a hand-pump sprayer for even coverage. Work in small sections.
-
Have a roller or brush handy to smooth out drips or over-applied areas.
Application Tips:
-
Don’t flood the surface. You want absorption, not puddling.
-
For penetrating stains: apply until the surface stops absorbing.
-
For topical stains: apply in thin, even coats (usually two).
❗ If the stain is pooling or forming a skin, your surface may still be too tight/dense — stop and reassess your prep.
➡️ View full LastiSeal Stain & Sealer application instructions »
Step 4 – SEAL THE SURFACE (If Needed)
-
Used an acid stain or penetrating stain only? You’ll need to apply a concrete sealer afterward to protect the color.
-
Used LastiSeal Stain & Sealer? No extra sealer needed — it’s built in. However, if an additional gloss or a “wet look” is wanted, you may apply a water-based acrylic or water-based urethane coating on top.
⚠️ Wait until the stain is fully dry before applying any topcoat — usually 24–48 hours depending on humidity.
Tips and Tricks for a Better Patio Staining Experience
A few expert tips can make all the difference between a disappointing finish and a professional-looking stained patio that lasts for years.
Here’s what we recommend:
✅ Plan Ahead
-
Choose a dry, overcast day or apply stain in the morning or late afternoon. Avoid hot, sun-baked surfaces or windy conditions that cause uneven drying.
-
Mask off nearby surfaces (like siding, planters, or trim) to avoid overspray.
✅ Test Before Committing
-
Always test the stain in a hidden area first to check color absorption and appearance.
-
Testing also helps identify whether your surface is too dense for proper penetration.
✅ Use the Right Application Tools
-
Sprayers deliver the most even finish and reduce marks or streaks.
-
Keep a brush or sponge nearby to feather out over-applied areas quickly.
✅ Know What to Expect from Your Product
-
Topical stains usually require two coats for even coverage — which effectively doubles your material cost.
-
Penetrating stains may only need one or two wet-on-wet passes, depending on how porous the surface is.
-
With LastiSeal, you can skip the topcoat — the built-in sealer saves time, effort, and money.
✅ Don’t Rush the Dry Time
-
Allow at least 24–48 hours of dry time after staining — especially if you plan to walk on or furnish the patio.
-
Cooler, more humid weather may extend the cure time.
🛠️ Pro Tip: Keep pets, foot traffic, and moisture off the surface until it’s fully cured to avoid smudges or uneven coloration.
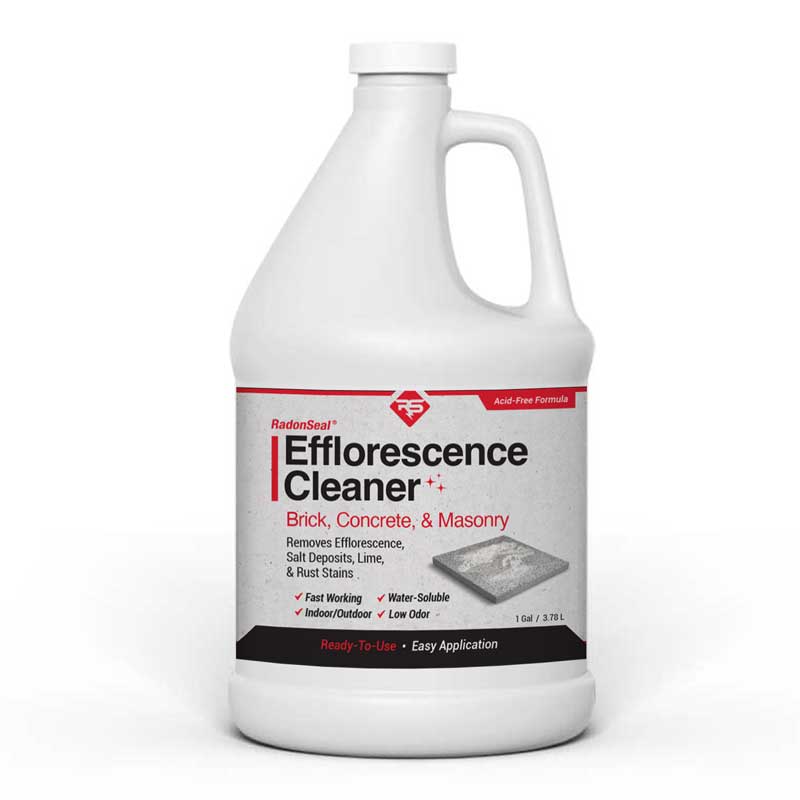
Efflorescence Cleaner
LastiSeal Concrete Stain & Sealer
Universal Concrete Cleaner