Coverage
Coverage is based on a filling a 1/4″ wide by 1/2″ deep crack or joint. ElastiPoxy can be used with or without sand depending on the type of void you are filling.
FLEXIBLE REPAIR (straight, without sand): 2-quarts will fill approximately 75 linear ft. (2-gallons fills approximately 300 ft.)
RIGID REPAIR (4:1 sand-to-ElastiPoxy ratio): 2-quarts will fill approximately 375 ft.
 Surface Preparation
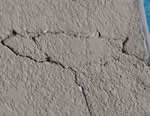
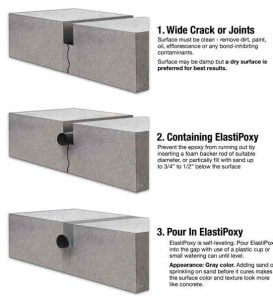
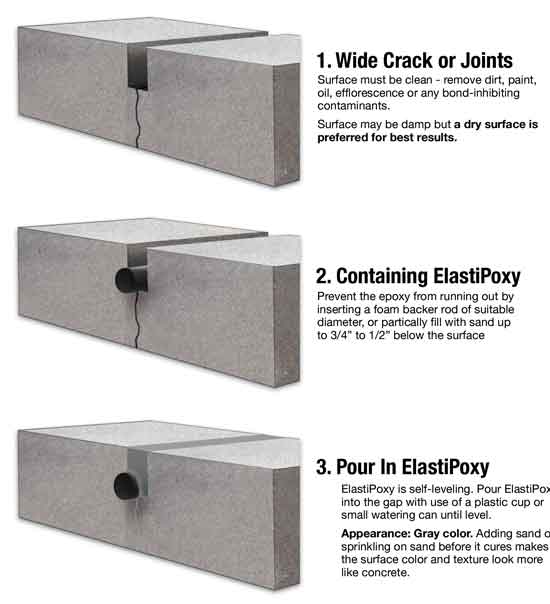
Before using ElastiPoxy the concrete or masonry surfaces must be clean. Remove ground-in dirt, paint, oils, grease, efflorescence, or bond-inhibiting contaminants. Air blow or shop-vac any loose debris or dust.
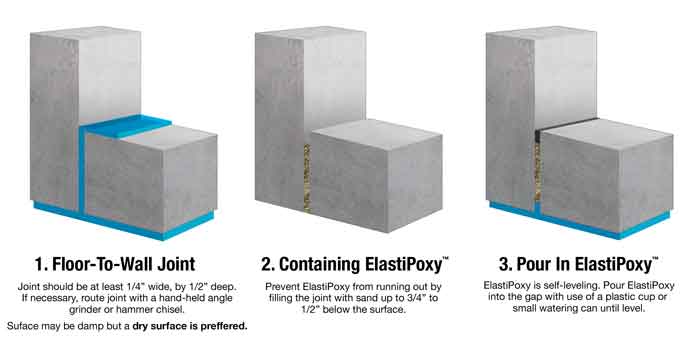
The surface may be slightly damp but a dry surface is preferred for best results. Surface temperature must be above 40 °F during the application and for 24 hours afterwards (see curing times below).
- Learn how this homeowner used ElastiPoxy to repair gouges, spalls, chipped edges, control joints, and cracks in a pool deck while matching the surface color and texture.
Crack or Joint Preparation
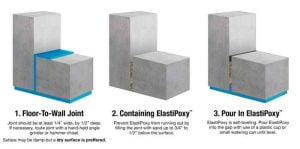
Narrow Cracks or Saw Cuts (< 1/4″) – The crack or joint should be at least 1/4” wide. If needed, chase cracks 1/2″ deep in floors or walls with a 4″ right-angle grinder, crack chaser diamond blade, or hammer chisel. Remove loose concrete and dust with air blower and/or shop-vac. Large Cracks of Control Joints (> 1/4″) – To prevent the epoxy from running out of the bottom of deep cracks or joints, insert a foam backer rod of suitable diameter (sold in big box stores), or partially fill with sand or caulk up to 3/4” to 1/2” below the surface. This will also serve as a bond breaker* to prevent the filler from adhering to the bottom of the joint. The depth of the remaining void should not exceed its width.
Leaky Tie Rods – Hammer chisel out the concrete at least ½” deep. Remove loose concrete and dust.
* Make sure that ElastiPoxy does not bond to the bottom of the control joint or crack. Using the backer rod and/or sand will prevent this from happing. Example; If the filler adheres to the bottom of the joint and the crack in the bottom is 1/8″ wide, a 1/8″ movement of the concrete would require a 100% elongation of the epoxy spanning the crack. This exceeds the limits of elastic epoxies and the joint filler would crack.
 Mixing Procedure
Exact measurement is important and must be adhered to! ElastiPoxy has a short pot life – 30 to 45 minutes. Mix only as much product as you can easily apply within 30 minutes.
STEP 1 – Using the two drill mixing attachments provided, mix each container (A & B) with your slow-speed electric drill. Do not cross contaminate the mixers.
STEP 2 – Using the measuring cups, pour equal amounts of Compounds A and B into separate mixing cups.
STEP 3 – Mix both compounds together by pouring them into a clean mixing cup, plastic pail, or similar.
STEP 4 – Mix both compounds together for at least 2 minutes using one of the mixer attachments.
ADD SAND IF NEEDED – Add construction sand (or sand without fines) – at the appropriate ratio – to the mixture using a measuring cup. Mix thoroughly for 3-5 minutes. Using sand provides a stiffer mixture for vertical surfaces, more volume, and a rigid rather than flexible repair.
STEP 5 – After mixing, allow the mixed ElastiPoxy to off-gas for 15 minutes.
 Application
STEP 6 – Tack-coat the joint, crack, or surface with pure epoxy (without sand) using a paint brush.
STEP 7 – Simply pour in the pure epoxy or apply the sand-epoxy mix as described below:
- EXPANSION CONTROL OR FLOOR-TO-WALL JOINTS, CRACKS IN FLOORS:
The pure ElastiPoxy is self-leveling. Pour the epoxy into the joint with a plastic cup or small watering can until level. - HOLES OR DIVOTS, SPALLS OR PITS IN CONCRETE SLABS:
Use 2:1 or 3:1 sand to epoxy ratio. Apply with a trowel and smooth out. Tip – Broadcast sand over ElastiPoxy before it cures to add texture and prevent tracking. Lay strips of masonite or plywood over the area if immediate traffic use is required. - WIRE TIES, CRACKS OR HOLES IN POURED CONCRETE OR BLOCK WALLS:
Use a 5:1 or 6:1 sand-to-epoxy ratio and force the mix into the crack with a trowel, starting at the bottom. If the epoxy sags, mix in more sand. - LEAKING OR DETERIORATED CONCRETE BLOCKS:
Use 2:1 or 3:1 sand to epoxy ratio. Apply with a trowel, pushing hard to fill the pores.
Visual Guides for ElastiPoxy Application


POT LIFE – 30-45 minutes.
INITIAL SET: – Depends greatly on ambient temperature (est.):
| 80°F or higher | 45 minutes – 1.5 hours |
| 65°F to 79°F | 1 hour – 3 hours |
| 50°F to 64°F | 3 hours – 4 hours |
| 49°F and below | 4 hours – 8 hours |
Clean-Up
Tools clean up with water while still wet after installation (if cured, clean using xylene or aromatic solvent.)
Shelf Life & Storage
Unopened containers – 1 year. Store in a cool dry location out of direct sunlight. AVOID FREEZING!