
Easy DIY Waterproofing Solutions That Will Last
Wet, damp, and humid basements are the most frequent complaint we hear from homeowners. Traditional, decades-old basement waterproofing methods have not passed the test of time because water always wins. Slab-on-grade homes and buildings suffer similar moisture problems due to the infiltration of water vapor and water seepage. There are solutions, but one must first understand how basements begin leaking water.
“Over 60 percent of basements have moisture seepage in one form or another, while 38 percent experience mold and fungus growth due to an elevated moisture level.” The American Society of Home Inspectors.
Improving Your Home’s Health – For over 25 years, our line of Penetrating Waterproofing Sealers, DIY Foundation Crack Injection Kits, Concrete Floor Repair Kits, and basement waterproofing and radon mitigating products have proven to be the ideal solutions for drying out basements. Commercial-grade, high-strength, long-lasting, and unique materials that continue to be trusted by building contractors and DIY homeowners nationwide. Products that permanently waterproof and damp-proof wet and leaking foundation walls and basement concrete floors to significantly improve the overall health of your basement and home.
The Permanent Concrete Sealer – RadonSeal Deep-Penetrating Concrete Sealer is not “your father’s” waterproofing paint or sealer. It differs from paints and membrane coatings by penetrating deep inside concrete (up to 4″), chemically reacting with “free lime” and alkalis, expanding within the pores and capillaries of concrete, and curing as a hard mineral. RadonSeal will seal your concrete internally against the transmission of capillary water seepage and water vapor and is strong enough to seal against radon gas.
Why Do Basements Start Leaking Water?
A hard-driving rainstorm or melting snow can temporarily raise groundwater levels. A 1,500 sq. ft. roof sheds almost 1,000 gallons of water for every inch of rain. Rain gutters and downspouts get plugged up with debris. New houses have a problem with “reverse grading,” which usually occurs several years after construction. Fill dirt around the foundation settles, directing rainwater right to the foundation.
As the run-off seeps through the soft topsoil around the house, it pushes against the walls and stops at the undisturbed ground beneath the footings. Footing drains may break as the house settles or silt up. If the soil is clay, the water rises in the disturbed soil around the foundation, like inside a pool.
Hydrostatic Pressure
When water accumulates around the foundation, hydrostatic pressure builds up and causes the basement to leak. Clay-rich soils do not drain well and hold rainwater against the foundation walls. Water pushes its way inside through any cracks or joints and the pores in concrete. Rising groundwater is sometimes the problem or even an underground spring. Houses settle and underground water flows change. New construction down the street may shift groundwater flows and cause basement leaks in your home.
Settling Cracks
As houses settle, concrete develops stress cracks that leak water. Exterior waterproofing disintegrates or separates due to the “alkali attack.” When water migrates toward embedded steel, it rusts, expands, and cracks the concrete.
Efflorescence Signifies Water Seepage
Water penetrates the pores in concrete, dissolves alkalis, and enlarges the pores. As concrete ages, it becomes more and more porous. Initially, the seeping water evaporates, leaving on the surface salts and lime. This “white deposit” or efflorescence is a telltale sign of capillary water seepage.
Plastic Barriers Do Not Last
Concrete slabs, although much thinner than basement walls, get even less waterproofing protection. The plastic “vapor barrier” underneath soon disintegrates due to the caustic lime in the concrete, and over time, the layer of gravel (“drainage pad”) silts up. Then, the concrete starts pulling in groundwater by capillary action.
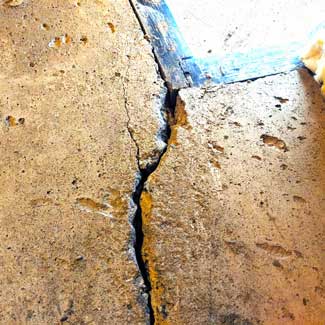
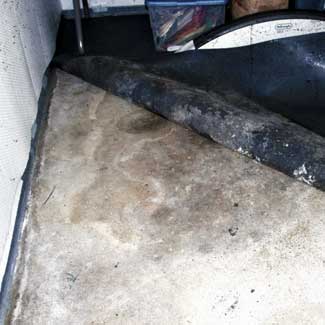
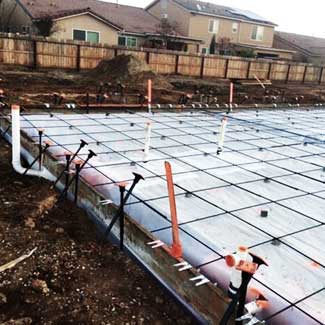
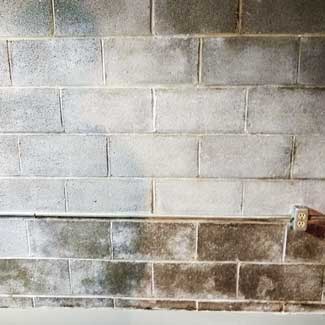
Left to Right: Settling crack in a poured concrete foundation wall. Trapped moisture underneath a rug. Installation of a concrete vapor barrier. Efflorescence purging from concrete block basement walls.
Exterior Basement Waterproofing Does Not Last Forever
Tar Waterproofing Is Brittle – Tar waterproofing coating has no “give” and soon starts cracking as the concrete constantly contracts and expands, and the house settles. Similarly, tar paper or pargeting (a layer of mortar) on block walls is inelastic and will crack.
Concrete is very strongly alkaline (pH above 9). Water carries dissolved alkalis to its surface, where they attack any coating by saponification (“alkali attack”) and even the concrete itself. Alkaline soils in some regions speed up this process and can “eat away” inches of concrete in several years.
All waterproofing coatings gradually break down or separate, even flexible elastomeric membranes. Elastomeric sheet membranes separate as the alkalis attack the primer and taped joints – that’s why their service lives are guaranteed for only 5 to 10 years.
In the end, the concrete is on its own. It may continue to do a good job for several years, but water will gradually activate alkalis, leach out the concrete, and enlarge the pores, making water seepage inevitable! Water is the root problem – the concrete and waterproofing coatings would last forever in perfectly dry conditions.
Wouldn’t it be great to somehow block water migration through the concrete’s pores and to protect the waterproofing coating against “alkali attack”?
That’s exactly what RadonSeal Concrete Sealer does!

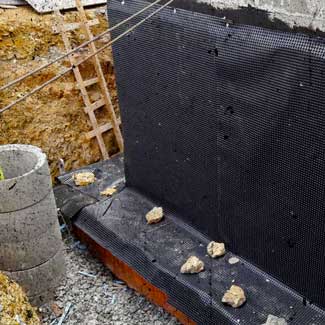
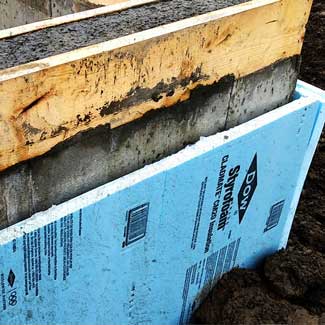
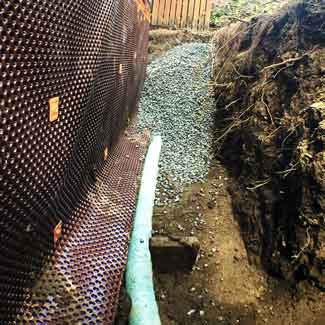
Left to Right: Tar-based foundation coating. Dimpled plastic sheets. Rigid foam insulation boards. Footing drain.
How To Waterproof Your Basement in 4 Steps
Tackling a basement waterproofing project can be a daunting task, but the labor involved may not be as strenuous as you thought. Follow this basic step-by-step approach for drying out your damp basement.
- Step 1 – Remove any paints, sealers, tile adhesive, efflorescence, and oils from the concrete.
- Step 2 – Shop-vac the surface of the concrete, removing loose or crumbling concrete, mortar, dust, and dirt.
- Step 3 – Seal the concrete walls and floor against moisture and water vapor with RadonSeal Concrete Sealer. You can move all your contents to one side of the basement and seal the other side first. Let the concrete dry, and then seal the other side.
- Step 4 – Make repairs to water leaks through foundation settling cracks, basement floor cracks, cold joints, control joints, floor-to-wall joints (cove-joint), pipe-protrusions, wire tie leaks, etc.
How To Seal a Stone Foundation Wall – Applying RadonSeal will help strengthen and waterproof old mortar as well as limestone. Remove any loose and crumbling mortar, efflorescence, and seal the wall using RadonSeal Plus. Afterward, tuck point holes, cracks, and seams in the mortar joints. RadonSeal will not inhibit the bond of new mortar, adhesive, thin set, paints, tiles, and our line of crack and joint repair products.
How To Seal a Brick Foundation Wall – Although it can be used on brick, RadonSeal Concrete Sealer is best used on concrete. When applying RadonSeal to brick, there is a risk of changing the appearance of the brick (leaving a white film on the surface that would be difficult to remove). For waterproofing a brick foundation wall, we recommend sealing it with LastiSeal Brick & Concrete Sealer.
DIY WATERPROOFING
Commercial-Grade Concrete & Basement Repair Products
__________
If your basement is still unfinished and unpainted, our line of waterproofing products will make waterproofing your basement concrete quick and easy and will save you both time and money.

RadonSeal®

Ion-Bond Armor®

DIY Crack Repair

CrackWeld®

ElastiPoxy®
RadonSeal – Penetrating Concrete Sealer
The champion concrete sealer for basement waterproofing. RadonSeal penetrates deep inside poured concrete and heavyweight concrete block to strengthen, densify, and permanently waterproof. An effective and affordable alternative to interior drainage systems and sump pumps. Use on basement floors and foundation walls to help keep your basement dry. Use before applying paint to protect it from efflorescence attack. Protect tiles, engineered flooring, and epoxies from warping and delamination caused by negative-side hydrostatic pressure. Basement waterproofing & radon mitigation in one.
CrackWeld Concrete Floor Crack Repair Kit
CrackWeld provides a permanent repair of cracks in basement floors and concrete slabs. CrackWeld’s low viscosity, self-leveling resin, can penetrate even inside hairline cracks without the need to grind or chase the crack! Designed with flooring contractors in mind, CrackWeld DIY Kits provide a permanent, strong, quick, and easy fix for repairing slab cracks. Each kit ships complete, and all you need is a standard caulking gun.
DIY Foundation Crack Repair Kits
Our diverse line of foundation crack repair kits are used for permanently filling cracks in poured concrete walls and stopping leaky cracks. Used by professional waterproofing contractors, the low-pressure injection method eliminates the need for drilling, making repairs easy enough for homeowners to do themselves. The low-viscosity urethane is suitable even for the repair of hairline cracks. You get a complete kit – all you need is a standard caulking gun for injection.
ElastiPoxy – Joint & Crack Filler Kit
ElastiPoxy is a highly-specialized epoxy for repairing control joints, floor-to-wall joints, cracks in concrete blocks, wide concrete cracks & spalls, damaged brick & mortar. ElastiPoxy is 100% soilds, self-leveling, and has a user friendly pot life. When cured, ElastiPoxy offers the desired flexibility and bond strength needed to fill and protect contraction joints and floor-to-wall joints. When mixed with sand, ElastiPoxy becomes a super-strong patching compound for repairing cracks in concrete block walls, wide stress cracks in floors, mortar joints, and filling concrete spalls in slabs.
How Water Gets Through Concrete
Concrete is naturally porous, typically 10 to 18% air (with extremes 2–60%). To make new concrete “workable,” a water-to-cement ratio of 0.45–0.50 is the norm, but cement only needs half of the water (0.25 w/c ratio) for hydration. As concrete cures, all the surplus water escapes to its surface and evaporates. This “bleeding water” leaves a network of tiny capillaries (pores) inside the concrete.
We cannot see the pores of the concrete. Their size ranges from 3 nm (millionths of an mm) to 0.1 mm (the diameter of a human hair). The median is about 1 micron (1,000 nm), but a water molecule is 3,000 times smaller (0.28 nm). By all logic, concrete should leak like a sieve!
So what holds the water back? Not the concrete but the physics of water itself. Although water is not as viscous as molasses, it takes pressure to push it through a dry microscopic pore. Surface tension holds the “blob” of water together inside the dry pore until its surface gets wet. But add repeated water pressure during occasional rainstorms or condensation on the interior and after a while, the inside of the pore gets wet and water starts flowing through it.
Concrete is hygroscopic – it attracts water by absorption. Once the pores are wet, they draw up water from the ground below by wicking action (capillary suction).
While it may take years for water to start seeping through the concrete, nothing holds back soil gases. Invisible water vapor and radon gas can flow freely through the pores and capillaries of the concrete. More on Basement Damp-Proofing.
Solutions That Will Cost You Money
Sump Pump Installation
($1,000–$4,000) – If your water issue is serious (a high water table), you will need to purchase and install a sump pump. Sump pumps drain water from the gravel bed underneath the basement floor. Relying on one sump pump, however, is risky, particularly if your basement is finished! The pump or the grid may fail during a severe storm or spring snowmelt. Installing a backup, either a battery-powered backup sump pump or a water-powered backup sump pump is a smart decision and inexpensive insurance.
Interior Drainage Gutters
($5,000–$10,000) – A plastic channel system (“interior gutters”) is glued around the perimeter of the basement floor to collect water seeping through the foundation walls and to take it to a sump pump basin. Why is installing plastic channels a bad idea? If you are planning to remodel your basement, common sense would tell you that water should be kept out and not allowed to seep in. It would be impossible to frame and finish the walls because water sitting in the channels behind the drywall would lead to mold and mildew problems. Moreover, the channel system does not address water seeping directly through the concrete floor.
Exterior Footing Drains
($15,000–$45,000) – Excavating earth next to the foundation walls, laying gravel, installing perimeter drains, removing old tar from foundation walls, sealing the concrete, applying a polymer waterproofing membrane, backfilling, and finally, re-landscaping.
Interior French Drain
(Estimated $10,000–$20,000) – The “go-to” solution of most waterproofing contractors. To install the French drain, the perimeter of the basement slab must be jackhammered. Dirt will then be dug out to form a trench, followed by laying a perforated pipe over a stone bed. The pipe drains the water from underneath the basement floor to a sump basin. The trench is then filled back in with concrete. This method does not work very well if the gravel bed is silted up and does little for seepage through basement walls. For foundation walls constructed of cinder blocks, contractors will sometimes leave a gap in the floor-to-wall joint. This allows water seeping through cracks, mortar joints, and the blocks themselves, to flow down into the French drain. These open gaps and the natural vacuum in basements cause a large inflow of moist soil gas and radon gas from the soil. This can increase humidity and radon gas levels in the house.
Exterior Foundation Waterproofing
Combining RadonSeal With An Exterior Waterproofing Coating – RadonSeal is commonly used in combination with exterior foundation coatings (damp proofing membranes), which are required by building codes in most counties. One of the benefits of RadonSeal is that it neutralizes alkalis in concrete. This protects waterproofing membranes, tar, paints, or rubberized sealants against “alkali attack,” extending their useful life.
Exterior coatings waterproof concrete by encapsulation and prevent water leaks by bridging settling cracks, cold pour joints, protrusions, seams, holes, and minor defects. RadonSeal plays its part in the waterproofing process by blocking the movement of water through the concrete. It is the last line of defense that the concrete foundation will benefit from when exterior coatings begin to deteriorate, crack, and disintegrate.
The lower the quality of concrete, the higher the need to apply RadonSeal before a waterproofing coating. Foundation walls constructed of cinder blocks or heavyweight concrete blocks have thin walls (only 1-1/4″ thick) on both sides of their hollow cores. Cinder blocks can have large visible pores that make them much more difficult to seal. The most effective method for waterproofing a newly constructed basement wall is to seal both sides of the concrete on the exterior and interior with RadonSeal. Afterward, allow the sealer to initially cure and the concrete to dry before applying the exterior waterproofing coating (2-4 days).
When contractors are required to backfill sooner, install the exterior waterproofing coating and apply RadonSeal just to the interior basement walls and the floor.
How To Check Moisture Transmission
Many home sales get re-negotiated or even canceled when the building inspector discovers moisture in the basement. Make sure to check for leaks and any visible cracks in the concrete, the floor-to-wall joints, expansion control joints in the floor, and all penetrations.
You can test for moisture transmission through the concrete by placing a foot-square of plastic or aluminum foil on the floor or wall, sealing the edges with duct tape, and checking for drops of water after a couple of days. Alternatively, you can use professional Vapor Transmission Test Kits.
What will building inspectors look for?
- Dampness – Residual dampness at the base of walls.
- Rust Stains – Signs of rust at the base of steel posts or the heater. Discoloration or decay on wood partitions, paneling, drywall, and wood posts.
- Efflorescence – Signs of “white powder” deposits on the concrete walls and floor.
- Peeling – Peeling floor tiles, paint, or mildewed carpeting.
- Mildew & Mold Stains – Stain from mildew on objects stored on the floor.
- Dampness – Dank odors in carpeting and finishes.
- Musty Odors – A musty smell indicating that molds or mildew have already taken hold.
- Condensation – On windows and concrete surfaces.
- Rain Gutters – Plugged or damaged rain gutters.
- Grading – Improper outside grading, puddling of water, saturated zones, and the growth of moss.
Waterproofing New Concrete Foundations
RadonSeal Concrete Sealer preserves new concrete and protects concrete against the gradual deterioration caused by groundwater. Sealing the concrete early on, particularly before finishing the basement, will help avoid future headaches! If you have a brand new basement, now is the best time to prevent future moisture problems, waterproof and strengthen the concrete, reduce dusting, cracking, and efflorescence, and preserve the concrete.
As concrete cures, it inevitably develops capillaries. Allow new concrete to cure for at least 28 days before sealing and damp-proofing the poured walls and slab with RadonSeal Standard. In the case of concrete block or cinder block walls, allow the new mortar to cure for at least 14 days before applying RadonSeal Plus and Ion-Bond Armor.


